A Quick Set-Up Guide for Single Node Hadoop Clusters
Hadoop is an open-source software framework for storing data and running applications on clusters of commodity hardware. It provides massive storage for any kind of data, enormous processing power, and the ability to handle virtually limitless concurrent tasks or jobs. Hadoop uses MapReduce computing.
Creating Single Node Clusters
Prerequisites
GNU/Linux is supported as a development and production platform.
Java™ must be installed. The recommended Java versions are described at HadoopJavaVersions.
ssh must be installed and sshd must be running to use the Hadoop scripts that manage remote Hadoop daemons.
Downloading Hadoop
To get a Hadoop distribution, download a recent stable release from one of the Apache Download Mirrors.
Unzipping
Begin by unzipping the Solr. Below is an example with a shell in UNIX:
hadoop-2.5.2.tar.gz/:$ unzip -q hadoop-2.5.2.tar.gz

/:$ cd hadoop-2.5.2/
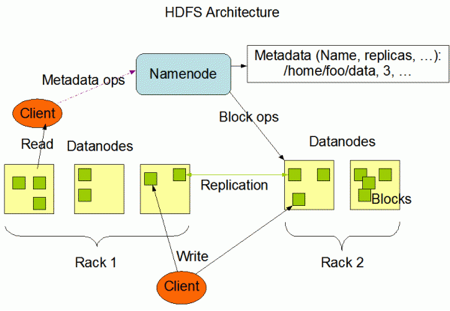
Hadoop Distributed File System (HDFS)
HDFS is a distributed file system designed to run on commodity hardware. It has many similarities with existing distributed file systems, including enormous processing power and the ability to handle virtually limitless concurrent tasks or jobs. HDFS provides high throughput access to application data and is suitable for applications that have large data sets. HDFS relaxes a few POSIX requirements to enable streaming access to file system data.
Configuration
The only required environment variable we have to configure for Hadoop in this tutorial is JAVA_HOME. Open hadoop-env.sh (The full path is /hadoopfolder/etc/hadoop), where Hadoop folder belongs to the folder that you have extracted, and check whether the JAVA_HOME environment variable is set or not.
1. Conf/*-site.xml
In this section, we will configure the directory where Hadoop will store its data files, the network ports it listens to, etc. Our setup will use Hadoop’s Distributed File System, HDFS, even though our little “cluster” only contains our single local machine.
The file is located at hadoopfolder/etc/hadoop where the Hadoop folder belongs to the folder that you have extracted. We can set the hadoop.tmp.dir parameter so that it denotes the name of the directory in which the Hadoop will store the data. The other parameter that we need to set is fs.defaultFS, which denotes the name of the default file system. More Parameters can also be set.
<configuration>
<property>
<name>hadoop.tmp.dir</name>
<value>/home/snagpal/Desktop/hadoopdata</value>
<description></description>
</property>
<property> <
name>fs.defaultFS</name>
<value>hdfs://snagpal:54310</value>
<!-- <description>The Name of tegh default file system</description>-->
</property>
</configuration>
2. Conf/* mapred-site.xml
The next file to be configured is mapred-site.xml
<property>
<name>mapred.job.tracker</name>
<value>localhost:54311</value><!--localhost denotes the hostname-- > <description>The host and port that the MapReduce job tracker runs at. If "local", then jobs are run in-process as a single map and reduce task.
</description>
</property>
We can also set other Parameters.
3. Conf/* hdfs-site.xml
The next file to be configured is hdfs-site.xml
<property>
<name>dfs.replication</name>
<value>1</value>
<description>Default block replication. The actual number of replications can be specified when the file is created. The default is used if replication is not specified in create time.
</description>
</property>
Formatting the HDFS File System via the NameNode
The first step to starting up your Hadoop installation is formatting the Hadoop file system, which is implemented on top of the local file system of your “cluster.” You need to do this the first time you set up a Hadoop cluster.
To format the file system (which simply initializes the directory specified by the dfs.name.dir variable), run the command.
snagpal@snagpal$ /hadoop/bin/hadoop namenode -format
In this command, Hadoop is the folder in which we have extracted the Hadoop.
Starting Your Single-Node Cluster
This will start up a Namenode, Datanode, Jobtracker and a Tasktracker on your machine.
To check the SSH status on your machine, use the following command:
snagpal@snagpal$ sudo /etc/init.d/sshd status
To start the single-node cluster, use the following command:
snagpal@snagpal$ /hadoop/sbin/start-all.sh
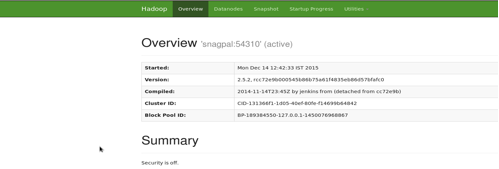
You can see the results on your browser by using the following URL: http://<hostname>/50070
Running a MapReduce Job
We will now run your first Hadoop MapReduce job. We will use the Word Count Example job, which reads text files and counts how often words occur. The input is text files and the output is text files, each line of which contains a word and the count of how often it occurred, separated by a tab.
1. Make a Directory: We need to create a directory on HDFS so that we can copy the data from local to server for further processing.
/bin/hdfs dfs -mkdir /
In the above command, dirname denotes the name of the directory. For example: bin/hdfs dfs-mkdir/sumit.
The directory can be seen on a browser as such:
2. Copy data to HDFS: Before we run the MapReduce job, we need to copy the data to HDFS. We will copy the data from local files to the HDFS directed that we created earlier.
/bin/hadoop fs -put
<inputfile>: tThis contains the path of the file that needs to be copied to the HDFS directory.
<destination>: This contains the path of the output HDFS directory where we need to put the data.
For example: /Hadoop fs -put/home/snagpal/Desktop/test.txt sumit.
3. Run the MapReduce job to count words: Now we can run the MapReduce job that will count the words.
/bin/hadoop jar /hadoop/share/hadoop/mapreduce/hadoop-mapreduce-examples-2.5.2.jar wordcount
<input>: This denotes the name of the directory where we have copied the input files on the HDFS.
<output>: This denotes the output directory where the results will be copied.
For example: /hadoop jar ../share/hadoop/mapreduce/hadoop-mapreduce-examples-2.5.2.jar wordcount/sumit/output
The output directory will be created and the result will only be in the output folder.
Shutdown
The following command can be used to stop the Solr server:
snagpal@snagpal$ /hadoop/sbin/stop-all.sh
Recent blog posts

Stay in Touch
Keep your competitive edge – subscribe to our newsletter for updates on emerging software engineering, data and AI, and cloud technology trends.


